Frequently Asked Questions: Billing
Many of the adjustments to a financial visit/record can be done from within the individual visit “Visit Details.” A common pathway to a visit record is Home > Patient > Financial tab. Scroll down to the bottom of the Financial screen and select the hyperlink for the individual visit that needs to be adjusted. This pathway will be used in the following FAQs unless otherwise stated.
Q:How do I reverse a payment posted on a visit?
A:
Identify which code is linked to the misapplied payment. Select that code within the Ledger display there is a small icon on the right-hand side (hover and it will show Adjust Ledger). The only option on the next screen will be “Adjust Ledger,” as partial amounts cannot be adjusted at this time. The entire amount will be reversed, and the user can reapply the appropriate monies to the appropriate visit.
Q:How do I modify the information (CPT/ICD/Charge) on an Encounter?
A1:
Before the Encounter status has been changed to “Ready to Bill,” any changes can be made within the Encounter screen from the patient’s chart.
A2:
After the Encounter status has been changed to “Ready to Bill,” but not yet submitted to the payor, changes will be made from the Visit Details within the Financial tab.
A3:
After the Encounter status has been changed to “Ready to Bill,” and submitted to the payor, changes will need to be considered a corrected claim.
Q:How do I view the payments, write-offs, and/or adjustments that have been posted to an individual line of a visit?
A:
From the Visit Detail, select the hyperlink for each procedure code.
Q:How do I change the amount for a CPT?
A1:
If the encounter has not been billed, the amount can be changed in the Fee box within the encounter
A2:
If the encounter has been billed, the amount can be changed in the Visit Details of the specific CPT under Plan Fee Amount.
Q:How do I send a corrected claim?
A:
From the individual Visit Detail, select “Resubmit.” Select the Extra Info tab and update the field “Claim Frequency” status to “corrected.”
Q:How do I make a payment to the account vs. a single visit?
A1:
A payment can be applied to an account applying the monies to the oldest balance first from the Financial tab of the Patient’s Chart. The “Payment” option is at the top, right-hand corner of the screen.
A2:
When a payment needs to be applied to an individual visit, use the “Payment” option at the bottom of the Financial screen after the appropriate visit line has been highlighted.
Q:How do I know a claim has been submitted?
A:
The Visit Detail screen will display “Yes” or “no” under “Submitted”
Q:How do I know if there is an electronic EOB?
A:
Choosing the Elect EOB tab from within the Visit Detail will display all available EOBs for the selected visit.
Q:How do I send a paper claim for an electronic payer?
A:
From the Visit Detail, update the status of “Force Paper” (middle of screen) to Yes. To manually print the previously submitted claim, select “View Submit” and when the system displays the claim form, select print. A color printer is recommended for the claim to print in CMS1500 format.
Q:How do I change an insurance payer on a visit?
A1:
Before the Encounter has been marked “Ready to Bill,” the insurance can be updated within the Visit Details from the Encounter screen.
A2:
Once the status is “Billed,” but has not yet been submitted to the payor, the appropriate plan can be updated within the Visit Details.
A3:
Once the status is “Billed,” and it has been submitted, changes would be made by choosing Resubmit and update the plan within the Visit Details.
Learn how to create and revise a master appointment schedule for the practice.
- Identify those days, locations, and/or providers that may need a specific schedule
- Anticipate times of the day where the appointment slots may need to vary
- Discuss the option to allow ‘overbooking’ for certain days, locations, and/or providers
- Determine how far into the future a schedule can be reasonably set for each location and/or provider
- To build the perfect master schedule, select “Create New Schedule” and enter the information as needed
Learn which features can best be managed from which tab within the system.
- Calendar tab can be customized to see multiple provider’s schedules (up to 6) by selecting the Multi View and the action item to select Settings
- Patients can now be checked in/out from the Calendar tab
- Search when there is an extended block of appointments to move, block or unblock
- Scheduling Day Sheet can now provide a list of an individual patient’s appointments; move multiple appointments for an individual patient; cancel multiple appointments and document the reason; find unlinked appointments; and identify and link unlinked copayments
- Wait List will identify all appointments requested by established patients through the patient portal
- Schedule is the place to create and revise the master appointment schedule for the practice
Learn more than one workflow for checking a patient in/out.
- Use the Home Dashboard for Today’s Appointments
- Use the Calendar tab in either the daily or weekly view
Learn the importance of sequencing the posting of a copayment with the start of a visit.
- Copayment can be posted from three (3) primary steps in the visit process
- Copayments posted after the visit has been started will not be automatically linked to the visit unless posted from the Encounter or Check-Out
- Unlinked copayments can be reconciled from the Scheduling Day Sheet
Timeline and Important Deadlines
The CMS submission window is now open for Performance Year 2018.
Practice EHR users can submit and update data for the MIPS report any time while the submission window is open.
You can access the CMS submission window through the following URL:
https://qpp.cms.gov/login The last date to submit the MIPS 2018 report is April 2, 2019. CMS will close the submission window for Performance Year 2018 at 8 p.m. EDT on April 2, 2019.
Practice EHR users can search and generate the report for ACI (Advancing Care Information, now known as Promoting Interoperability) measures through the following steps:
1. Go to Report
2. Go to Clinical
3. Go to MIPS Report
4. Select Provider
5. Select Reporting period
6. Select “ACI” MU stage dropdown
7. Click Search
A screenshot is attached for reference.
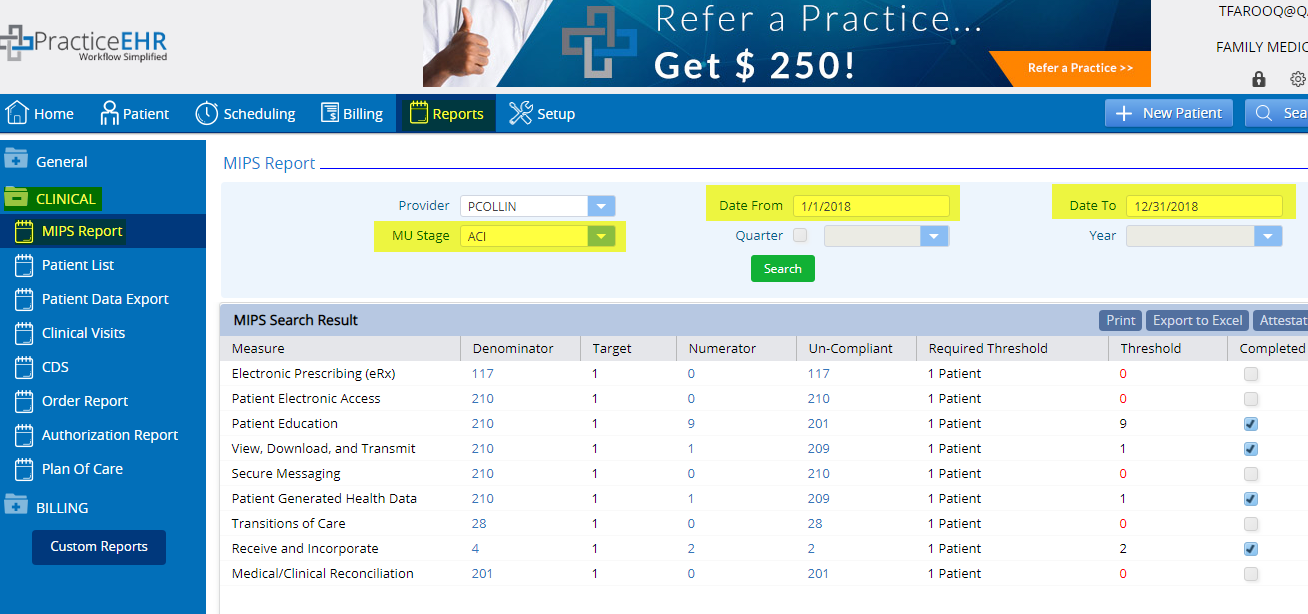
Practice EHR users can also create a support ticket if any help/assistance is required for MIPS submission.
Learn how to navigate the patient chart, view clinical information and more in Practice EHR.
The patient chart gives you an overview of important patient information.
- Quickly access patient information like insurances, preferred pharmacy, visit history, notes and appointments, vitals, current medications, lab results, patient history, allergies and more.
Learn about the patient flow sheet in Practice EHR.
The patient flow sheet shows all information related to signed off notes in a patient’s chart.
- The patient flow sheet can be accessed in the patient chart by clicking on the expandable “Flow Sheet” tab on the right side of the screen.
- Here you will be able to view the sections of the signed off visit note, any alerts associated with the visit and the dates.
- Furthermore, if you want to do a more in-depth comparison of signed off visit notes you can filter them by sections and time period from the drop down menus.